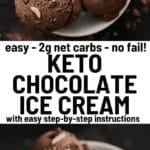
Learn how to make the best keto chocolate ice cream with just five simple ingredients. This sugar-free chocolate ice cream is incredibly creamy, rich, and full of deep chocolate flavor—just like the kind you would find at your favorite ice cream shop, but much healthier and lower in carbs.
Perfect for satisfying any sweet tooth while staying on track with your keto or low-carb goals, this homemade ice cream is easy to prepare and sure to become a new favorite in your kitchen.

Just as summer approaches, it’s the perfect time for a chill, chocolatey treat that’s sugar-free, low in carbs, and easy to make at home. This keto chocolate ice cream is made with simple, wholesome ingredients and delivers a rich, creamy texture without the extra carbs found in traditional ice cream.
If you’ve been wondering whether you can enjoy ice cream while staying keto, the answer is yes. This creamy, chocolate-loaded dessert fits perfectly into a low-carb lifestyle and is sure to be loved by everyone—whether they follow keto or not.
Craving a smooth, scoopable ice cream that’s both refreshing and chocolatey? This easy keto chocolate ice cream recipe is exactly what you need.
And if you’re looking for more low-carb frozen treats, you’re in luck. You can also try our keto strawberry ice cream for a fruity twist, keto vanilla ice cream for a classic option, or sugar-free frozen yogurt for a refreshing, lighter choice. There’s something for every craving!
- 1 Is Ice Cream Keto-Friendly?
- 2 Why You’ll Love This Keto Chocolate Ice Cream Recipe
- 3 Keto Chocolate Ice Cream Ingredients
- 4 How to Make Keto Chocolate Ice Cream
- 5 Top Tips for Perfect Keto Chocolate Ice Cream
- 6 Mix Up Your Keto Chocolate Ice Cream
- 7 Storing Your Keto Chocolate Ice Cream
- 8 FAQs
- 9 More Keto Chocolate Recipes
- 10 Tools To Make Homemade Sugar-Free Chocolate Ice Cream
- 11 Keto Chocolate Ice Cream
Is Ice Cream Keto-Friendly?
Traditional store-bought ice cream is generally not keto-friendly because it’s high in sugar and carbohydrates—two things that can quickly throw you out of ketosis. Most regular ice creams are loaded with added sugars, making them unsuitable for a low-carb lifestyle.
But the good news is that you don’t have to give up ice cream on keto!
There’s a whole world of keto ice cream recipes made with naturally low-carb ingredients like almond milk, heavy cream, coconut milk, and keto-friendly sweeteners such as erythritol, stevia, or allulose.
These homemade versions are not only much better for your macros, but they often taste even better than store-bought options—extra creamy, rich, and satisfying without the sugar crash.
Why You’ll Love This Keto Chocolate Ice Cream Recipe
- Quick and Easy to Make – You can have this rich, creamy chocolate ice cream whipped up in just 35 minutes, with minimal effort.
- Perfect for Meal Prep – Make it ahead of time and store it in the freezer, so you always have a keto-friendly dessert ready when cravings strike.
- Customizable to Your Taste – Adjust the sweetness, chocolate intensity, or even add mix-ins like sugar-free chocolate chips or nuts for extra texture.
- Made with Wholesome, Low-Carb Ingredients – No hidden sugars or unnecessary additives—just real, keto-approved ingredients that support your low-carb goals.
- Low in Carbs – Each serving has only 2g net carbs, making it perfect for maintaining ketosis without giving up dessert.
- Loaded with Rich Chocolate Flavor – Every bite is deep, chocolatey, and satisfying, offering the classic ice cream experience you love.
- Ultra Creamy and Smooth – Thanks to the combination of heavy cream and quality cocoa powder, the texture is silky, scoopable, and feels just like traditional ice cream.
- Guilt-Free Treat – Enjoy a delicious dessert without worrying about sugar spikes or extra carbs.
- Healthier than Store-Bought Ice Cream – No added sugars, artificial ingredients, or preservatives—just pure chocolate goodness in every scoop.
- Refreshing and Perfect for Summer – This ice cream is a great way to stay cool during hot days while staying completely on track with your keto lifestyle.
Keto Chocolate Ice Cream Ingredients
You only need five simple ingredients (plus a pinch of salt) to make this delicious sugar-free chocolate ice cream. Here’s what you’ll need:
- Egg Yolks – Used to thicken the ice cream base and create a rich, creamy texture without the need for stabilizers.
- Sweetener – Choose your favorite powdered keto sweetener. I used erythritol, but monk fruit sweetener or allulose also work wonderfully. Powdered sweeteners dissolve better and help keep the texture smooth.
- Unsweetened Almond Milk – A great low-carb liquid base. You can also substitute with unsweetened coconut milk for a slightly different flavor or a dairy-free option.
- Heavy Cream – Full-fat heavy cream adds richness and creaminess to the ice cream. If you prefer a dairy-free version, substitute with full-fat canned coconut milk.
- Cocoa Powder – Use a high-quality unsweetened cocoa powder for the best intense chocolate flavor. Dutch-processed cocoa will give a smoother, more mellow chocolate taste, while natural cocoa is slightly more bitter and bold.
- Salt – Just a pinch to enhance the chocolate flavor and balance the sweetness.

How to Make Keto Chocolate Ice Cream
This sugar-free chocolate ice cream is easy to prepare and delivers a rich, creamy texture every time. Here’s how to make it step-by-step:
Whisk the Egg Yolks and Sweetener
In a large bowl, combine the egg yolks, powdered sweetener, and a pinch of salt. Whisk until the mixture turns a light yellow color. Set aside.
Heat the Cream Mixture
In a medium saucepan, mix the unsweetened almond milk, heavy cream, and cocoa powder over medium heat. Stir occasionally until the mixture starts to simmer gently.
Temper the Egg Yolks
Remove the saucepan from the heat. Slowly pour the hot cream mixture over the egg yolk mixture, whisking constantly to prevent scrambling. Continue to whisk until the mixture is creamy and smooth.
Cook the Custard
Pour the creamy mixture back into the saucepan. Cook over low heat for about 5 minutes, stirring frequently, until the custard reaches 170°F (76°C). It should thicken slightly but not boil.
Chill the Mixture
Remove from heat. Cover the custard with plastic wrap, making sure it touches the surface to prevent a skin from forming. Refrigerate for at least 4 hours or until completely chilled.
Churn the Ice Cream
Once the mixture is cold, pour it into a pre-frozen ice cream maker bowl. Churn for 20–25 minutes, or until the ice cream reaches a soft, creamy consistency.
Serve or Freeze
Enjoy the ice cream immediately for a softer texture, or transfer it to a freezer-safe container and freeze for a few hours until firm for a more traditional scoopable texture.
Top Tips for Perfect Keto Chocolate Ice Cream
- Use High-Quality Ingredients – Choose the best heavy cream and cocoa powder you can find. Higher quality ingredients create a richer, smoother, and more flavorful ice cream.
- Don’t Over-Churn – Keep a close eye on your ice cream while it’s churning. Over-churning can cause the ice cream to become grainy or icy instead of soft and creamy. Stop when it reaches a soft-serve consistency.
- Chill the Custard Thoroughly – Make sure the ice cream base is well-chilled for at least 4 hours (not just 2) before churning. A properly chilled mixture leads to a smoother texture and faster freezing, which reduces the chance of ice crystals forming.
- Prevent Freezer Burn – Cover the ice cream with a tight-fitting lid or plastic wrap pressed directly onto the surface before freezing. This helps keep your ice cream fresh and prevents freezer burn.
- Use a Pre-Frozen Ice Cream Bowl – If your ice cream maker requires it, ensure the bowl is frozen solid (overnight if possible) before churning. A properly frozen bowl speeds up the churning process and improves the final texture.
- Add Sweetener Carefully – Powdered sweeteners work best because they dissolve more easily, ensuring the texture stays creamy rather than gritty. If using erythritol, expect the ice cream to firm up more after freezing; monk fruit blends or allulose can keep it softer.
- Let It Sit Before Scooping – If you freeze the ice cream until solid, let it sit at room temperature for 5–10 minutes before scooping for the best creamy texture.

Mix Up Your Keto Chocolate Ice Cream
Looking to add a twist to your basic keto chocolate ice cream? Here are some fun flavor variations and tips to take it to the next level:
- Chocolate Mint – Add a few drops of peppermint extract to the mixture for a refreshing, cool chocolate-mint flavor.
- Mexican Chocolate – Stir in a pinch of cinnamon and a small dash of cayenne pepper for a warm, spicy twist inspired by traditional Mexican flavors.
- Chocolate Hazelnut – Mix in 2 tablespoons of sugar-free homemade keto Nutella spread and some chopped hazelnuts for a rich, nutty variation.
- Mocha Chocolate – Add a shot of espresso or 1–2 teaspoons of instant coffee powder to the custard base for a bold mocha flavor.
- Keto Caramel Swirl – Drizzle in keto caramel sauce during the last few minutes of churning for pockets of caramel goodness throughout the ice cream.
- Pro Tip for Easy Scooping – Run your ice cream scoop under hot water before scooping. This helps the scoop glide through the frozen ice cream for perfectly rounded scoops.
Storing Your Keto Chocolate Ice Cream
- Freezer – Store your keto chocolate ice cream in an airtight, freezer-safe container for up to 3 months. To maintain the best texture, press a piece of parchment paper or plastic wrap directly onto the surface before sealing the container. This helps prevent ice crystals from forming.
- Extra Tip: When you’re ready to serve, remove the ice cream from the freezer and allow it to soften at room temperature for about 5–10 minutes. This makes it much easier to scoop and gives you that perfectly creamy texture.
FAQs
Can I Make No Churn Keto Ice Cream?
No ice cream machine at home? No problem! Here are a few handy tips for making your own no-churn keto chocolate ice cream, making the process as smooth as the ice cream itself.
- Skip the Machine: Instead of using an ice cream machine, just pour the mixture directly into a container that can be safely popped into the freezer.
- Stir It Up: To avoid the formation of ice crystals , make sure to remove the container from the freezer every half an hour to an hour. Stir the mixture well each time. This helps break any ice crystals that might have started to form, ensuring a smoother texture for your ice cream.
- Sweeten Smartly: If available, consider using allulose as your sweetener. It has a very similar taste and texture to regular sugar but won’t affect your blood sugar levels, making it an excellent choice for a keto diet.
- MCT Oil Magic: While it might seem a little unusual, adding MCT oil can make a world of difference! Unlike regular coconut oil, MCT oil remains liquid even when frozen, contributing to a silkier texture in your ice cream.
- Add-In Ideas: Adding a little bit of alcohol, such as rum or vodka, to the ice cream mixture keeps it smooth and creamy. The alcohol lowers the freezing point of the ice cream, helping it stay softer and more scoopable. Another option is to use xanthan gum, a plant-based thickening agent. Try adding about ¼ teaspoon to this recipe and see how you like the texture. Remember, these are optional and can be experimented with as per your preference.

Can I Make This Ahead of Time?
Yes, you can! Ice cream is perfect for making in advance.
Absolutely! This is one of the perks of homemade ice cream. It’s freezer-friendly and can be made in advance, ready to satisfy your sweet cravings whenever they strike.
Is This Keto Chocolate Ice Cream Gluten-Free?
Absolutely, this recipe doesn’t use any wheat-based thickeners.
How Can I Stop Ice Crystals Forming?
To prevent the formation of ice crystals on your keto ice cream, it’s advisable to stir the ice cream mixture frequently during the churning/freezing process.
More Keto Chocolate Recipes
- Keto Chocolate Mousse
- The Best Chocolate Covered Strawberries
- The Best Keto Chocolate Cake
- 2 Ingredients Keto Chocolate Truffles
- Coconut Flour Chocolate Cake
- Keto Brownies
Tools To Make Homemade Sugar-Free Chocolate Ice Cream
re are some kitchen tools that can make your ice cream making experience even better:
- Saucepan: A saucepan is an absolute must-have for preparing the custard base for your ice cream. Something like this one would be the perfect size for your needs.
- Ice Cream Maker: While you can make no-churn ice cream (as we discussed earlier), an ice cream maker can make the process much more hands-off and give your ice cream a professional texture. I recommend an automatic ice cream maker like this one. It’s a breeze to use and doesn’t leave much ice cream clinging to the sides – meaning more in your bowl!
- Ice Cream Scoop: To get that classic ice cream scoop shape, invest in a good ice cream scoop. It not only makes serving easier but also gives your homemade dessert a store-bought look!
- Ice Cream Bowls: Make your dessert time more fun with these ice cream bowls that come with matching spoons. They’re sure to add an extra dash of joy to your keto chocolate ice cream experience.
- Freezable Ice Cream Container: If you’re planning on storing some ice cream for later (or making a big batch!), a good-quality freezable container is essential. Look for ones with tight-fitting lids to avoid freezer burn.
Keto Chocolate Ice Cream
Description
Ingredients
- 2 cups heavy cream
- 2 1/2 cups almond milk unsweetened
- ½ cup cacao powder
- 5 large egg yolks
- ⅔ cup sweetener allulose or powdered erythritol
- 1 tbsp vanilla extract
- ¼ tsp salt
Instructions
- Mix the Egg Yolks and Sweetener. In a large mixing bowl, whisk together the egg yolks, powdered sweetener, and salt until smooth.
- Heat the Cream Mixture. In a medium saucepan, combine the unsweetened almond milk, heavy cream, and cocoa powder. Cook over medium heat, stirring occasionally, until the mixture just starts to simmer.
- Temper the Eggs. Remove the saucepan from the heat. Slowly pour the hot cream mixture over the egg yolk mixture, whisking constantly to avoid curdling.
- Cook the Custard. Pour the mixture back into the saucepan. Cook on low heat for about 5 minutes, stirring continuously, until the mixture thickens slightly and reaches 170°F (76°C).
- Chill the Custard. Remove from heat. Pour the custard into a clean bowl. Cover with plastic wrap, leaving a small air gap at the sides to prevent a skin from forming. Refrigerate for at least 4 hours until completely chilled.
- Churn the Ice Cream. Once the mixture is cold, pour it into a pre-frozen ice cream maker bowl. Churn according to your machine's instructions, typically 20 minutes to 1 hour, until the mixture is thick and creamy.(Tip: It's okay if it doesn’t fully reach soft-serve consistency—it will firm up in the freezer.)
- Freeze and Serve. You can enjoy the ice cream immediately for a softer texture, or transfer it to a freezer-safe container and freeze until solid for a firmer consistency.
- For Easy Scooping. If frozen solid, let the ice cream sit at room temperature for about 15–20 minutes before scooping to soften slightly and make serving easier.
How do we calculate the nutrition info?
These nutrition facts listed are determined using nutrition information from the USDA Food Database. Our nutrition facts are accurate, but if you are using different products, please make your calculations. Net carb count is calculated by subtracting both fiber and sugar alcohols because they don’t raise blood sugar.